Drywall is a finish material used on interior walls, and when installed correctly, creates a base for a smooth finish of paint on your wall. A bad mud job however, can make your wall look less than ideal, with uneven patches showing through the paint. It may seem obvious to paint over the problem areas in your wall, however, this will not fix the problem as the paint will settle as unevenly as before leaving you back at square one. Let us explore then, how to best fix a bad mud job on a painted dry wall.

Table of Contents
APPLY TOPPING COMPOUND
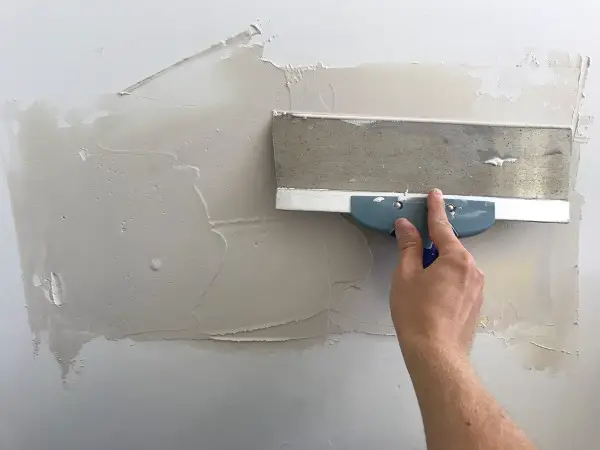
Topping compound also known as mud, comes in premixed or setting varieties. The setting type comes in a powdered form which is mixed with water to an appropriate consistency and applied. The premixed type on the other hand, comes as the name suggests, premixed in a bucket, ready to be applied to the dry wall. Mud is an appropriate medium for this because it is easy to sand when dry, the next step in correcting a poor mud job on a painted drywall. Before the actual work begins, it is important to first protect your clothes and your floor from mud splatter as well as to prep the wall. Protecting your clothes is as simple as wearing old clothes or overalls and as for your floors, you can cover them with an old canvas cloth or layers of newspapers. After ensuring that you have protected your clothes and your floors and choosing the most ideal mud variety for your situation, you can begin prepping the problem area. Using a sponge, dampen and clean the area with warm water, then allow it to dry. With a wide tapping knife, apply the mud over the problem area(s), feathering the compound at least two centimetres around the patched area in all directions. Also make sure to taper the mud smoothly, blending it into the existing wall. After application, wait about ten minutes for the mud to dry.
SANDING
Once the mud has dried, the first step in improving a poor mud job on your painted dry wall is complete. With 150 grit sand paper, sand the set mud, evening it out to flush with the existing wall. After this, move onto sanding the area with 220 grit sand paper, which will smooth it out more, blending it even more finely along with the tapered feathered parts into the existing wall. It is also important not to sand too vigorously when amending a bad mud job on a painted dry wall as this will rub through the mud, creating depressions which are equally as bad in regards to an unevenly finished wall. After sanding, feel the wall with your hands for any raised areas, and sand them down. After this, use a torch to shine the area from different angles to ensure evenness. As a final check, with your fingers and hands, feel the previous problem area in relation to the rest of the wall in order to ensure that the imperfect patch is now flush with the rest of the wall. Any unevenness will show through the paint in the final wall, so it is important that the previously imperfect patch, and the existing wall are even.
PRIME THE AREA
The third step in fixing a bad mud job on your painted dry wall, is priming. Priming ensures that a similar texture exists between the patched up area and the rest of the drywall, sealing the surface and enhancing the uniformity of the paint finish, matte or gloss. After ensuring that the patched area and the rest of the wall are flush, you can now prime the area with dry wall primer. Use a 9-inch lint free roller that has a 3/8 or ½ inch nap to prime the area from top to bottom. This roller is ideal because it will apply a small amount of texture, which will help improve the flawed mud job on your painted dry wall by concealing the patches. After this first coat of primer, wait 24 hours and examine your patchwork under different light conditions. This first coat of dried primer can be considered the final test of the quality of your mud job. If uneven patches are still visible through the primer, step one and two will have to be repeated, because if not, the imperfections will show through the paint. If, however, you have a smooth and matte primed finish after 24 hours, you can proceed to prime the area with a second coat and allow it to dry. After priming with the second coat of dry wall primer you can proceed to painting.
PAINT THE AREA
Now that the wall is primed, you can move into the final step of correcting an imperfect mud job on your painted drywall. It is essential at this stage to obtain the exact same colour painted on the existing wall to paint over the patch. This may not be possible in some cases, as such, for the sake of a uniformly painted wall, you must prime and paint the whole wall with a uniform colour, or if you tend towards the eccentric, you can intentionally paint a different colour over the previously problematic area resulting in an intriguing feature wall. To ensure proper adhesion, it is ideal to apply two coats of paint with a 24-hour interval between each coat.
CONCLUSION
Even though Fixing a bad mud job on a painted dry wall isn’t as obvious and easy as painting over the problem area, as the steps in this article show, it is equally not as difficult. With a quick trip to the hardware store alongside this basic guide, the bad mud job showing through your painted dry wall, will be fixed in no time, and so will that tinge of irritation you felt every time you looked at what should have been a perfectly smooth wall.